Disclosure / Disclaimer: I received this product, free of charge, from Fiskars, for review purposes on this blog. No other compensation, monetary or in kind, has been received or implied for this post. Nor was I told how to post about it


![]()

Well Mother's Day may be behind us, but we have Graduations, Weddings, Father's Day, and more coming in the next few months of Summer, don't we?
We all want to make our gifts stand out from the pile, and personalization is on eway to do that!
To help you on your way Fiskars, a company you KNOW for quality crafting tools, has a new cutting item that will make your gift giving life easier AND more creative!
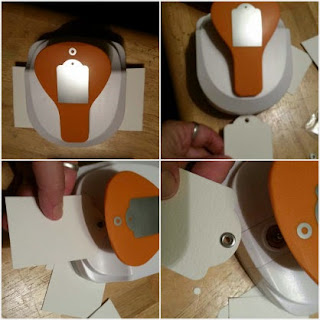
Meet the Tag Maker:

Available in four different designs, the Tag Maker is a Standard Tag Maker with Built-in Eyelet Setter, making it the perfect tool for any crafting or gift project! In three simple steps you can create a tag with an eyelet and use it to label jars, make cards, tag presents, etc.

Your Tag Maker comes with a bonus 20 eyelets, so you can start crafting and gifting with it right away!
It is very simple to use. You take your piece of carstock (it can punch up to 80 ln cardstock!) or paper, that is 2 1/2 by 3 1/2 and place it in the bottom slot. Press down on the top orange handle and you get a z" x 3" tag, with no hole.
Then you place the tag in the middle slot, press down again, and you now have a perfect hole. Easy peasy so far, right? It gets easier!

Just place a bottom eyelet (3/16" eyelets are provided, but the punch can also accommodate 5/32" eyelets) on the top base, place the tag with the hole over the eyelet, and then place the top eyelet. Press down, and now you have perfect eyelet trimmed hole.

Ta da, you are done in about 1 minute! I like using the double eyelet for more strength on tags that may get pulled on a lot. But for simple projects, one eyelet would be enough.
You have to love that!
Here's an idea for a quick project, perfect for last minute end of the year Teacher Appreciation gifts:

Use your printer and print out 'cards' when whatever lettering you want, sticking with the size stated above. Then punch your tag out and then just turn your tag around and punch the decorative end on both sides, punch holes on both ends, and then add twine of ribbon and you can wrap around a ribbon or paper bedecked candle, jar of goodies, or even canister of candy. Insanely easy.
Trust me when I say once you start using this punch you will want to use it for everything! And withit's lifetime warranty, it is a product you can count on over and over! be sure to check out the Fiskars project page and Pinterest Boards, for more super crafting and gift ideas, like this fun (above) Chalkboard Calendar, made using the Tag Maker! It also makes a fun gift idea for your crafting friend, sister, mom, or your child's teacher! AND if Dad sells items at the local Farmer's Market or Festivals, he might like it for pricing tags too! Everyone could use one! So be sure to pick up an extra one, when you buy yours! If not, be prepared to share! LOL
Comments
Post a Comment