Disclosure / Disclaimer: I received this guest post,free of charge, from Merri Cvetan, via Home Depot, for posting purposes on this blog. No other compensation, monetary or in kind, has been received or implied for this post. Nor was I told how to post about it
Have you ever found the PERFECT set of curtains, and then brought them home and they didn't fit right?
Yup, we've all been there!
Merri has an easy fix to save those curtains and your dream look!
And the timing is great, with the kids going back to school!
 |
| Photo: Drapery Panels with Added Hem |
You know how it goes; life gets busy with work and kids’ activities, and your home projects get put on hold. But you walk through your living room everyday thinking it needs an update or a new look. Maybe you’re not ready to take on a full-blown redecorating project—you just need something new to freshen it up.
One of the fastest ways to update a room is to change the curtains. First, you choose a color and style. If repainting isn’t in your future plans, look for a color, pattern or texture that goes with what you have
(painted walls and upholstered sofa and chairs). Style will depend upon whether you need to open and close your curtains.
The best piece of design advice I can give regarding window treatments is to hang your curtains or draperies as high as possible. That means installing the hardware close to the ceiling. This gives
the illusion of really high ceilings. Your eye is drawn up and can make a small room feel bigger and
grander.
The challenge can be finding drapery panels that are the right length. Fortunately, adding length is easy
and fast, and you end up with custom draperies without the custom price tag.
 |
| Photo: Drapery Panels Before |
In this room, I installed a white wood drapery pole with ball finials, 2 inches from the ceiling. The panels have a grommet heading and hang just below the windowsill apron—definitely too short. The solution to make them longer is to add-on a piece of fabric.
 |
| Photo: Paisley Drapery Fabric |
I found a coordinating drapery fabric in a stylized paisley print. Since curtain panels are generally 50 inches wide, look for drapery and upholstery fabrics, which are usually 54 inches wide.
When adding on, the new fabric should meet the existing panel at the sill line. That way you will end up with one horizontal line across the drapery and window. It will look seamless and intentional. In this step, your fabric panels may go from short to long—I had to cut off the bottom 5 inches from each
panel.
Measure from the sill to the floor and add 5 inches (1 inch for seam allowance and 4 inches for the
hem). For example, this windowsill is 24 inches from the floor. I needed a 29 inch piece of fabric (24 inches + 5 inch = 29 inches).
Sew the new fabric to the bottom and finish the sides to match the original panels. Bottom hems look
best if they are 3 inches deep (the extra 1 in. is to turn under for a nice clean edge).
 |
| Photo: Cut Off Hem |
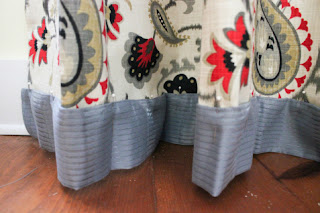
I could have stopped there, but I thought the panels needed something more. To make the new draperies look really custom-made, I wanted to finish them with the same grey fabric.
 |
| Photo: Pin New Hem |
I first pinned the hem from the original panels to the new fabric to make sure that’s the look I wanted.
 |
| Photo: Drapery Panels Close-up |
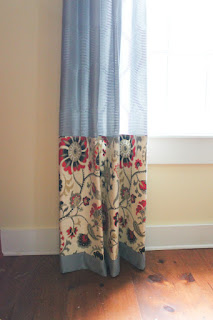
It was perfect—just enough to make the new panels look like they came that way!
I like the way the blue bottom lined up with her windowsill- it gives the eye an horizontal line,making for a more pleasing effect! And one that looks like a custom design panel!
What do you think?
About the Author:
Merri Cvetan is an interior designer who enjoys sharing the many DIY projects she creates for her 1890s-built Wisconsin farmhouse. Merri writes about her projects for The Home Depot. A large selection of drapes and curtains that are available at Home Depot can be found here.
Comments
Post a Comment