Disclosure / Disclaimer: I received this info, free of charge,from CSI Wall Panels, for blog posting purposes on this blog. No compensation, monetary or in kind, has been received or implied for this post. Nor was I told how to post about it, all opinions are my own.


Every now and then I have the TIME to really work on my house,
and change rooms to really reflect my current tastes.
and change rooms to really reflect my current tastes.

For example, my bedroom- I have always loved the light green walls, as they help to really relax and allow you to go to sleep. The French prints and other puzzle prints,a lways reflected my love of travel. But after 12 years, it was definitely time for a change!
So when the opprtunity came up to try out a new, MODERN DIY method, it seemed like the perfect moment to get back in the DIY mode, and change out my bedroom!
CSI Custom Wall Panels are a new type of wall covering- 3d wall panels!
The panels are made of MDF wood fiber, or a Sugar-cane fiber (which mine was-which I thought was approproate, being in Louisiana!). These modern panels are made for the DIY'er to put up themselves, with the basic of tools!Not only are the eco-friendly, they are lightweight AND paintable.
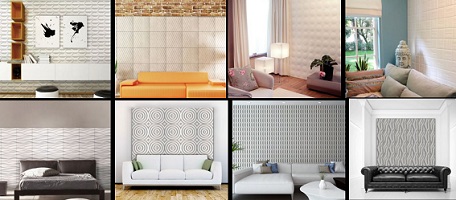
Check out some of the available designs, and how natural they look:
It was a VERY hard decision to make, as there were just SO many wonderful designs to pick from,
but I decided on their 'coastal drift' looking design, that seemed to mimic waves to me.

Each package of tiles come with 12 panles, enough to cover 32 square feet, or a 3 x 8 area, if your math is rusty! Some of the different panel options come with 10 per box, for 27 feet, it just depends on which one you select. The tiles are really good size at 19 inches by 19 inches (19.68 inches by 19.68 inches, to be exact), so you have different design options. I love how they come with plastic sheeting in between the, to not only protect them in shipping, but to keep you from getting any errant adhesive on the front panels, when picking up your next one to install! Plus they come with a set of plastic spacers, so you can keep your tiles perfectly spaced apart!
I decided to make my decorative grid 4 panles across by 3 panels down. So taking Gradnpa's advice to heart, I measure the walls twice, laid out the grid, and then again, while laying out painters tape (which is why you see it in the pictures below), so I would know EXACTLY where my squatre should be. This made it a LOT easier to move on alaong and get the tiles up in one sitting.

Now FULL disclosure here:
I had some problems getting the panels to STICK to my walls. Which is why you aren't seeing pictures from that process. The problem startedt when I decided to remove the old drywall, that was cheap and needed to come out, due to moisture issues, from the previous ac unit. This left me with the original plaster walls, to cover. And the beginning of the issues- I went through 2 different brands of pipe on adhesive, before finding the right one that worked- leaving the panels attached to the wall, and not sliding off (which is why you have no in progress photos- every time I'd step back to take a photo, they would slide off the wall! Yes, it was funny in retrospect!LOL)
From contact with the company and other DIYers, this appears to have been an anomally, probably due to the type of plaster on the 100 year old walls. So basically, I made my own issue, rather accidentally, and with the best of intentions (do it once, rather than having to repeat it later when drywalls needs to come down). Normally, putting the panels on regular dry wall, there should have been NO issues, using ANY basic adhesive!
But once they started to stick (and stay),
the process went VERY quickly!

I did have my choice whether to vary the panel edges, or to put them exactly the same way all the way across, so they would perfectly line up.This is the beauty of 3d wall panels- the ability to customize them! On the bottom row I varied the panels to creat more movemebt, but then on the top and middle row, kept them all the same. In the picture above, you can see it in the top left picture. It's very subtle and once you realize it is there, you can see it, but otherwise the human eye just sees it as a more natural order.
Then the decision on paint.
That involved a lot of this:

Yup- it took a few days of checking out colors, bringing them home and looking at them in the light of the bedroom, and changing my mind twice. Yeah, I know, I know...
The end result was sticking to 3 colors all on the same paint card, so they naturally flowed into one another, but selecting the darkest and lightest, and middle colors. Then picking a neautral matching grey for the walls. Course then the question was to paint all one row one color, or to go for a natural wave like picuture. Fate intervened with a picure in a magazine I was looking at, while waiting for Miss Grace to finish her piano lesson, that showed some beach waves cresting over one another, in the same hues I had picked out! Lightbulb moment if there ever was one!

So starting in the middle panel, I varied the 3 paint colors, in different widths. The lightest color on top mimiced the waves' foamy spray and got 4 'lines' of the panel. Then the darkest color came next, with only 3 'lines', mimicing the shawos under the spray of the dark water. Then the next 4 'lines' were the middle color, becoming the base water under the 'wave'. Then I repeated the coloration up and down the grid. Adding in one coat of the wall paint and then we let it sit for 2 days to see whether the wall color was enough. It ended up needing another coat to really make the panels stand out.

As you can see the blues in the panel perfectly mirrorded the blues in my linen set, and the nightstand that had been in Miss Grace's remove, til her room was redone. I took the middle water color and used it for the top and draw front, to add another burst of color. The cabinet on the left will get it's own coat of blue later, so that the color is on both sides.I will probably change the light switch cover out as well, from it's previou silver to either the same greay or the dark blue from the waves.

As you can see the beach shades of blue and greay really work together to give that same relaxing feel, like the previous wall colo had, while really taking the wall to a modern level. The pixture above shows the wall in lamp lighy, while below shows natural light.

WShen there is a lot of light, you get more of the under grey tone showing, which is fine with me, as to be it is more natural. The ocean looks blue because it reflects sunlight. But having spent so many years in San Francisco, I like a grey overcast beach day!
Here is more a a middle tone, with the blinds shut. You can really see the beat effect and HOW well the panels took the paint, and work together to create a central piece of art!
And really that IS what you are making- a wall of art!
Would I do it again? You bet!
I'm already contemplating using the panels for 2 walls in the upstairs creative room (new term- it's filled with nothing but art and craft supplies, and a TV! Miss Grace said 'craft room' sounded like a classroom, and we needed a new term- hence Creative Room, LOL), and for the staircase walls!
Want more inspiration before you take the DIY plunge with these great 3d wall panels?
Check out CSI Wall panels on their social media sites for more inspiration:
Twitter: https://twitter.com/
Pinterest: https://www.pinterest.com/
GooglePlus: https://plus.google.com/
and Youtube: https://www.youtube.com/watch?
Comments
Post a Comment