Disclosure / Disclaimer: I received this product, free of charge, from Yaheetech, for blog review purposes. No compensation, monetary or in kind, has been received or implied for this post. Nor was I told how to post about them. All opinions are my own.
Even if you don't sell things at festivals, there is a need to have your own Commercial Pop-up Canopy-backyard birthday parties, bbqs, camping, holidays, special events, you name it, you can use these easy to put up tent canopies anywhere and everywhere! Our old canopy finally dies, so it was time to upgrade into a modern version, so we were thrilled when the opportunity came to check out this version from Yaheetech!
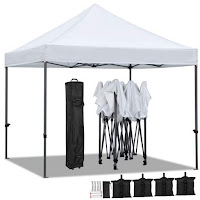
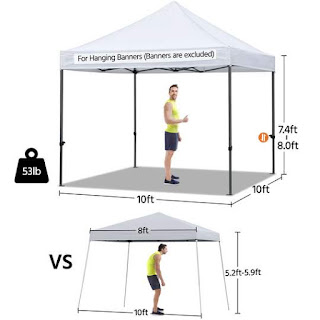
Their canopy is made of heavy duty, waterproof 500 density oxford fabric fabric, that is UPF50+ ultraviolet-proof, and CPAI-84 fireproof. It is the 10x10 standard size, but with a higher roofline and made from coated steel (and plastic). Plus it comes with a super wheeled carry bag to carry it all. It even comes with it's own sand bags (4) and tie downs (4 and fittings)!
Advantages to having the wheeled bag are easy to see- everything in one place, means you can't loose anything, while it's in your garage/shed, etc, when not in use! The outside pocket is sturdy and easily holds the tie downs and sand bags. Although we chose to store ours inside the bag with the canopy. Admittedly, this is a heavy duty tent, which means you're rolling 50 lbs in the carry bag! But is has sturdy rollers, and the carry bag itself is made from the same sturdy oxford cloth as the tent. Handles appear to be triple reinforced, and their padded hold, makes them easy to hold. You have one on the end, as well as on the front side, so it's easy to lay down to unzip, if that is your preference (which for short people will be mandatory, LOL), in order to get the carry bag off the canopy, to put it up! The zipper also feels sturdy and easy to use. Note that is IS tall/long, so some of you may need to put a seat down and put it from trunk to back seat, as it won't fit cross wise in a trunk!
My ONLY complaint is with the instructions. Yes, they have pictures. And it DOES take you step by step, BUT some of the instructions are a little vague, like putting the top pole in (and taking it OUT). In fact, there are NO instructions for reversing the process, which can leave you wondering if you are supposed to leave the top on, or take it off every time it's used (leave on is the answer). But once you put the canopy up, it will make more sense, and you'll know what to do. I HIGHLY recommend doing so BEFORE you need to use it for the first time, so it's easier and quicker, when you do need it. I also suggest 2 people. While not technically necessary, the tent can get balanced and unwieldy if not (remember 50 pounds of steel versus you, LOL)
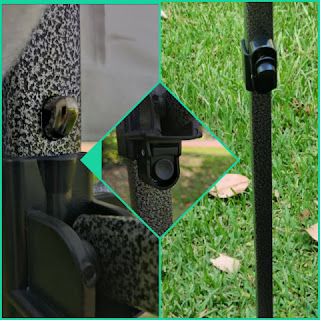
When you undo the canopy from the carrying bag, for the first time, you will need to pull it apart some, and then put the canopy on it. Which is made very helpful by the lovely velcro that is ATTACHED to the top of the poles, making it not only easy to attach, but for the canopy top to stay ON the poles if it gets windy!
As you can see, the matching velcro strips are also sewn into the canopy, so you have a STURDY connection! There are also reinforced tabs, that cover joint areas, to keep the fabric from rubbing during windy days and damaging it! Very thoughtful!
Once you get the canopy on, then you will stretch the tent out to its 10 x 10 size and start raising the legs up. This is completed by pushing in on the side buttons, and pulling up and over the metal buttons. There are 3, so you can choose your height (adjustable range is from89.4inch to 96.5inch. Note that is is MUCH bigger than traditional cheaper canopies:
Once you get some height set, then you can go under and insert the TOP center pole, for the center height. Now two warnings. Make sure you DUCK when you under, to insert the center pole, if you haven't raised the height up yet (ie 2 short people and n step stool). Because these are METAL poles, and you do NOT want to hit your head on the cross bars can give yourself a concussion, like I did (literally!). Setting the top pole can be a pain! This is the only harder thing for short people, and where you might need a short stool. The top pole (which is about a foot long) slides into a placket in the canopy cover and then is inserted into the top center pole. Now if you're 5ft tall and you've set canopy for over 7 feet, you start to see the problem, LOL. So bring a tall person for that (you'll have same issue on take down, as center pole has to come out, so canopy can fit back into the carry bag!
Once the top pole is set, you can move your canopy legs completely out (if you haven't already) and attach the sand bags and tie downs. I dint do this for the pictures, but as you saw above. the sandbags have velcro sewn on them as well, so they attach and do NOT move off the tent (yeah!!). Tie downs are highly recommend for uneven surfaces, as again, this is a heavy canopy! While it is not 'technically' recommended for use during very windy situations, I fell confident that it can handle some wind and be ok, as long as sand bags are used.
The last helpful feature of the canopy is the four straps on the front of the canopy, that allow you to add a business or personalized banner, to make your tent stand out and grab attention, in a field of others (like at a festival or multi-tent get together). I would suggest placing the banner on after you spread legs out, but BEFORE you raise the tent up!
We really love the sturdiness and portability of this tent, and you will too! You can purchase this tent on the Yaheetech website, or on Amazon (where they do have special discounts for combined item purchases).


Comments
Post a Comment