Disclosure / Disclaimer: I received this product, free of charge, from Carrera-Revell of America, for review purposes on this blog. No other compensation, monetary or in kind, has been received or implied for this post. Nor was I told how to post about it. All opinions are my own.
We've all been there- Family Game Night.
You hear the sighs...you've played all the games you have repeatedly, the kids aren't up for card games, jigsaw puzzles are too boring....
Sigh......
Carrera-Revell of America heard your kids, and are helping to spice up family game night with the #D Puzzle Sets!

Their 3D Puzzle Sets include a wide variety of famous buildings, skylines, and destinations ranging from the Empire State Building and Statue of Liberty, to Big Ben and the Eiffel Tower! These puzzle sets are the perfect way for families to enjoy game night while discovering the world in 3D through handcrafted fun!
Revell is known for their model car kits- I can't tell you HOW many of them my dad and I put together when I was younger! So you know you are getting a higher quality 3D jigsaw puzzle!

We were sent their Light Up Eiffel Tower 3D Puzzle (#001509091) to review!
This set consists 84 puzzle pieces and the approximate building time is up to 2 hours (more on that in a minute). The package comes with a booklet of assembly instructions and the LED lights, but dies require 2x AA batteries. Recommended for kids and adults, ages 10 years old and up (anything under teen will probably REQUIRE an adult- again more in a sec).
The Eiffel Tower 3D Puzzle with LED Lights measures approximately 30.7" tall when assembled, and due to the high quality materials ,and detailed design, would be a perfect piece to display in any room, or office, after it is completed!
You You can also get a version without the lights (this one), if that is your preference.
The puzzle came in and I actually opened it and started sorting out the pieces on the dining room table, so we could get started on it,
As you can see, your wires are all in one bundle. Each is conveniently marked A,B, or C, just look at the tags on them. Then you get a VERY handy hole puncher. It really does speed up the process of punching out all the holes! And then you have all your puzzle pieces in bifold sheets, in numerical order in the pack (a nice touch). And then you have the instruction booklet. I definitely recommend keeping the box handing for visual references during your build.
Another plus, is that the pieces that are internal, have markings on them as well, where you will not see them, when the tower is built. Revell 3D puzzle pieces are made of precisely punched foam and paper components to make assembly easy with no glue or tools needed., per their instructions.
Let's look at the instruction boooklet for a minute.
Yes, look at it. There are no written instructions- everything is a diagram with numbers, and you have to figure out which piece.section is next. And if the wiring diagram looks complicated, then yes, it can be, because the wires do NOT attach to anything, so they basically are hanging everywhere in your way...but I digress, let look back at puzzle construction first.
As you can see, the hole puncher did a good job and when you slot your pieces together, they go in snuggish to stay put. I say this because sometimes we had piece sets fall out, as some holes weren't as snug as others, and if you push up fron underside, say when running wires, you might accidentally push the section OUT. Oops. This is one of the design flaws. But another plus is that when you do have multiple holes together, they are numbered, so you know which piece should go there, and again these are on the inside, so you won't see them when finished.

I will be brutally honest. I got the bottom platform together, and then it wanted to start stringing lights and I reached my limit with the non-instructional book. I want written instructions plus diagrams. My engineer child sat down and in literally 5 minutes had the lights figured out and in place. Then she started on the spire and was uber proud of herself, as you can see. At this point, I was basically punching out pieces and holes, then handing them to her!
I took a coffee break and that was when the verbal diatribe began. The lights would not stay out of the way, so working off the diagram she used some clear packing tape to keep them in place. Problem 1 solved. But Problem 2 quickly raised it's head as she realized that the build should have been backwards. While she understood putting thngs on the base, the more you push in pieces, the more stress you put on the base pieces and when you have to pickup up sections, it got cumbersome very quickly. She felt like working spire down to bottom support would have been much better- as you could secure the lights, without damaging the next tier, or having it come undone. SIGH.
Problem 3 was the one we literally could not get past. If you look at the last collage photo above to the bottom left, you can see that the 'legs' are support together, like a house of cards, leaned into each other. Which is fine, except there was no TAB to push in on the angles. Rather, they have to slide onto each other and you hope they stay put while adding the next layer. Unfortunately whenever you added in the in between trusses, they BOTH fell out, they would not lean together, but bowed out. SIGH. Literally we tried everything for 3 days before admitting it was NOT a 2 hour puzzle. Either our was not cut correctly, or it just has a huge design flaw, requiring plastic tape on the inside legs, to hold it together.
Sigh. Not what you want to hear.
On the plus side, the pieces look great, the battery compartment actually does slide out for easy replacement of batteries (and on/off switch is easy to use). But having said that you DO have to be careful when punching out and putting pieces in place, as they can fold as they are just cardboard foam pieces.
Again, I think ours just may not have been cut right. Though for us, we used it a a learning tool (seriously, we homeschool ALL the time, the kid starts it have the time!). Grace took a Physics of Man Made Disasters class last year (do NOT start me on how many lectures of bridge flaws I sat through LOL), so she basically used what she learned to point out where the design flaws were and how they could be made better. On a puzzle..For 45 minutes..And then added anther 30 minutes on how the trusses for the Eiffel Tower compared to the trusses of Notre Dame....Yeah, welcome to unschool homeschool life!
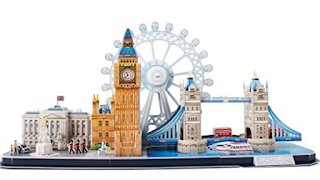
But we haven't give up on the 3D puzzle- she just has been too busy to reapproach it with the tape and finish attaching the spire section to the base section. And she does want to get the London puzzle, as she wants to tackle the ferris wheel of the
London skyline next! Oh yeah- potential bridge engineering and amusement park failure lectures for family night-LOL at least I know she paid attention in class! LOL
So find your favorite tonight and see what engineering skills you can discover on family game night!


Comments
Post a Comment